office inspiration: sewing space

My office is coming together. I finished painting the wall and corner where my desk and two bookcases will go. Since I like a clean desk and I already have a giant iMac on it, I’m thinking about turning the other corner into a small sewing station. Something similar to this, except in the corner:

If I could manage to find a desk like this for a better price, it would be perfect:

Here are some of my sewing space pins that I’m using for inspiration:


Posted in crafts, inspiration, office, organization, sewing | 4 Comments

man cave upgrade!

It was decided a while back that the man cave needed some manly flooring – especially after the incoming traffic from the garage and the back yard made the builder’s cream colored carpet start to look pretty run-down (and a couple little dogs that liked to dig in the garden and the flower beds in search of mice and toads and use the carpet to clean their little paws).

So with some wedding cash, we went to Costco a few weekends ago and took advantage of a special they had going on.

Brandon’s parents drove up for the weekend and Kiet came down to help Brandon and his dad. Here’s the room before….

It all began yesterday while I was at work. I got this picture message…

I guess it’s about time we got a nail gun if we are going to be true home “DIY’ers.”

Looks like Phoebe was helping too.

After the carpet was completely up!

And little by little, it started to come together!

We have some trim to stain tomorrow – stay tuned for the finished product!

Posted in DIY, man cave | 1 Comment

how have I never been to a hobby lobby?

This place is amazing. I can’t believe it took me this long to actually make the trip. I was in the area at the Bed Bath and Beyond ordering 4 bowls to complete our set of china and figured I’d stop in.

Lovely pinboards!

Fancy gold letters…

TONS of beautiful knobs… who needs Anthropologie when you have Hobby Lobby and a 40% off coupon?

Lots of themed decor – like these man cave signs. 

And of course I couldn’t head home without stopping into the newest “landmark” in the area…

It’s probably a good thing we don’t live in Columbia anymore. I’d come home with fresh flowers every grocery trip.

Likewise, Brandon would come home with a different wedge of blue cheese!

I think I’ll be back to explore Hobby Lobby a little more next weekend and I’m sure Brandon will want to see the new Wegman’s.

Posted in crafts, decor, life | 2 Comments

life is crazy

Life has been crazy lately. Maybe I’ll blog more about my career in a future post, but it’s been a crazy ride and it is actually starting to become rewarding. (I like my job?? – who am I??).

Anyway, we hosted a small Olympics gathering Friday night, had a very lazy but necessary Saturday and spent Sunday at Camden Yards with some friends we hadn’t seen since the wedding. Sometimes, I’d rather be a hermit and spend my weekends finishing house projects, but it is good to be social sometimes.

I managed to hem my curtains and Brandon helped mount the rods. Here is a picture before I hemmed the bottom and glued on my finials:

I spent most of last night working on the design in my office so that I could at least put together one bookcase and start organizing the sea of craft supplies floating between the office and the guest bedroom – the in-laws are coming on Thursday so they need somewhere to sleep:

And I finally saw the result of VERY hard work. I figured the cheap-o Target bookcases didn’t need a coat of primer, but I was wrong. Oh well.

But with some crown molding and fabric backing, they don’t look like cheap-o Target bookcases anymore!

Sorry for the bad picture quality – I was snapping away with my phone last night.

Posted in crafts, curtains, DIY, furniture re-do, life, organization, paint | Leave a comment

a new wreath and cheap curtain rods

While I made little progress on my office walls, I did get a few other things accomplished. The coffee filter flowers that I showed you how to make here and here went to good use on a wreath. I bought a stem of silk flowers on sale at JoAnn’s and cut all the leaves off to insert in between the flowers.

Maybe I will try out the natural brown colored filters next and make some purple flowers. The possibilities are endless. Such a beautiful wreath for under $8!

What is a weekend without a trip to Home Depot? Story of our lives… this weekend we bought lumber for our console table that we are going to start once we get our hands on a Kreg Jig. Then we wheeled over to the aisle where I was amazed to find that a pack of TEN 10ft 1/2” diameter electrical conduit was only two bucks. SOLD! That’s a lot of curtain rods. I got started as soon as we got home.

This stuff is absolutely wonderful –

I even managed to construct some rod holders for less than $1.00 each! See what happens when you stare at the brackets and electrical conduit accessories long enough?

And last but not least, I made some progress with my dining room curtains. Why is it that dogs always think that what is ours is theirs?

I laid the panels out lengthwise on the dining room floor and into the living room – 108” is longer than you think – and the dogs were pretty certain we’d rolled out a red carpet for them (they are color blind, aren’t they?). I bought some flat sheets at Wal-Mart for $5.00 to use as lining – much cheaper than buying fabric. I’m hoping to get some time this week to finish the seams so I can hang these by this weekend. Fingers crossed. 

Posted in crafts, curtains, decor, DIY, life, wreath | Leave a comment

weekend goals and a little painted wallpaper inspiration

So I started this blog post last week during my lunch break and realized that the wordpress interface would not (and still won’t) load at work. Boooooo. I started the post with the intention of listing all of my goals that I wanted to accomplish last week – the most important one being that I wanted to make some progress on the painted wall design in my office. Instead of showing the original inspiration that can be found here, I gathered up some examples of people who followed the tutorial. It’s pretty cool to see it in so many colors!

You can click on any of those pictures for the link to the blog. And here is how much progress I made this weekend…

There’s always next weekend, right?

Posted in DIY, inspiration, paint, wall | 1 Comment

paper flowers – part two: how to make coffee filter flowers

This is so easy you aren’t going to believe it! I was so excited that I didn’t take pictures when I cut the filters, so please bear with my terrible drawings I made in paint…

Using the coffee filters you colored in part one, you can cut one of two ways.

1) flatten one coffee filter and cut in a spiral until you reach the middle

2) layer 3 – 4 filters and fold in quarters, then cut per the diagram below

Now – follow the below to make the flower:

1) Roll out a strip of tape sticky side up – you can use painters tape or masking tape. I could only find scotch tape so any will do. If you use the second method, stick the little pieces you cut from the middle in a row. If not, move on to 2.

2) If using the first method, stick the middle thingy on the edge of the tape so that the rest of the coffee filter is trailing to your right. If using the second, start with one cut coffee filter, stick the edge with the ruffles facing upward and the rest of the filter trailing to your right. Now here’s the tricky part – start pleating by sticking parts of the filter to the tape. You’ll get the hang of it pretty quickly, I promise.

3) Continue pleating down the tape until you run out of coffee filter. For method 2, once you run out, just stick the next one on and keep going.

4) Once your done, starting at the beginning, roll the strip to create the flower. I rolled mine somewhat loose to get a looser, more realistic flower. This step is sort of trial-by-error.

5) Ta da!! Coffee filter flower!! You can experiment using more or less coffee filters.

Once I make a bunch of these, I’m going to stick them on a wreath with some leaves for some late-summer front door decor. Feel free to use JDC’s tutorial or Aunt Peaches’ tutorials for more pictures.

Posted in crafts, DIY, life, outdoors, wreath | 1 Comment

my office – making MORE progress

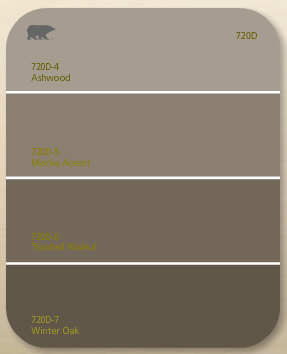
As I mentioned, while Brandon visited Bobby w/ Kiet in Ithaca for the Finger Lakes Wine Festival, I had the house to myself. I started my weekend by painting the cheap Target bookcases – which were a pain-in-the-butt in themselves (more on that later). Saturday, I visited Home Depot for some paint. Remember this swatch a picked out?

Yea – It’s kinda green in person. So I picked out “Down Home” from this swatch:

It wasn’t until I got up to the counter that I found out that Home Depot can mix the Valspar colors you get at Lowes – which is good to know because Lowes is more expensive. But at this point, I had already decided on the second color so that’s what I went with. I’m goad I did – the Valspar color would have been a little dark.

Painting is a workout. And my office is pretty straight forward – no crazy angles or heights. Here is a picture after I started the trim:

I had to sneak this one in for the “whatcha doin” text I knew I’d get at some point on Saturday:

And here’s the finished product!

It’s a little darker in person – the sunlight kind of lightens it up. I love it – It’s more feminine. I’ve gone back and forth over painting the white design, but I’m going to go for it. Hopefully I’ll at least get the wall where I’ll set up my desk completed this week so I can get my bookcases set up this weekend.

Posted in DIY, paint | 1 Comment

paper flowers – part one: how to color coffee filters

I came across this tutorial by Aunt Peaches and couldn’t get to Michaels fast enough. Luckily, we had a giant pack of coffee filters in the back of the pantry. I’m not sure what I’m going to do w/ my flowers, but Jones Design used them to make a beautiful fall wreath. I do need a late summer wreath….

Let’s get started!

1) Get some acrylic paint -the cheap stuff – these were only $.59 a bottle. The colors are endless!

2) In a disposable cup, add a couple drops of acrylic paint.  I mixed the red, pink and brown to get this color. The filters will turn out a MUCH lighter version of the color you mix up, so make it really dark if you want dark colors (aka more paint). You can go a step further and use the natural brown coffee filters. Next, add water about half way up. Mix really well.

3) Fold about 6-8 filters in quarters.

4) Push them down into the cup so they are completely submerged.

5) I waited about 5 minutes before pulling them out. You can wait longer if you want darker colors. Likewise, if your filters are too dark, run them under water until you achieve the color you want.

6) Ring them out really really good – the more paint you ring out, the quicker they will dry.

7) Lay them over paper towels or a brown paper bag. I didn’t want the paint to seep through onto my stove. Aunt Peaches suggested hanging them on a line for more realistic looking flowers – the paint will settle downwards, leaving you with a lighter color in the top and a darker color in the bottom. I wasn’t too concerned about that…

8) Here are some more – I made these a light cream color. I let them dry over night and they were ready to make into flowers the next morning.

paper flowers – part two – coming soon!

Posted in crafts, DIY, life, outdoors, wreath | 2 Comments

michaels dollar bins pay off

I’ve always been a get-it-done-right-now kinda girl… so when I see an easy DIY that I want to do, I want to do it ASAP. Hence why I went to Michael’s last night after work. (more on that coffee filter flower DIY later!).

Anyway, I usually find myself just grabbing what I need and getting outta there, but last night I decided to browse their dollar bins.

If you read my wedding blog, you saw this cool pint glass mustache tutorial:

Remember how I stamped the date on the bottoms?

Well I found alphabet stamps in the dollar bin. Even though I ended up using the pricey number stamps, the alphabet stamps worked perfectly too!

Back to my point – last night I found some great napkin rings. Driven by Decor beat me to it and blogged the below pictures – the ones I got are the plain ones in the top right.

The knotted ones would be perfect for a nautical event or wedding. Or even a beach house!

I’ve been looking for plain napkin holders for a while so these are perfect. Now I just have to figure out how to embellish them. I found these cool ideas from Stephanie:

I may try out a fabric flower this weekend. Although, beading would be nice. We shall see what I can come up with. Her tutorial shows how to make hers from scratch with burlap if you don’t have any napkin holders to start with!

Posted in crafts, DIY | 1 Comment